Internet of Things (IoT) for Raspberry PI
A question, a problem or a suggestion, don't hesitate : a little email
Applications for Internet of Things (IoT) using a MQTT Mosquitto server on the Raspberry PI :
- Setup of the MQTT server on the Raspberry PI,
- MQTT clock with the Sense Hat of the Astro PI,
- Meteo server using ESP8266 based sensors.
MQTT
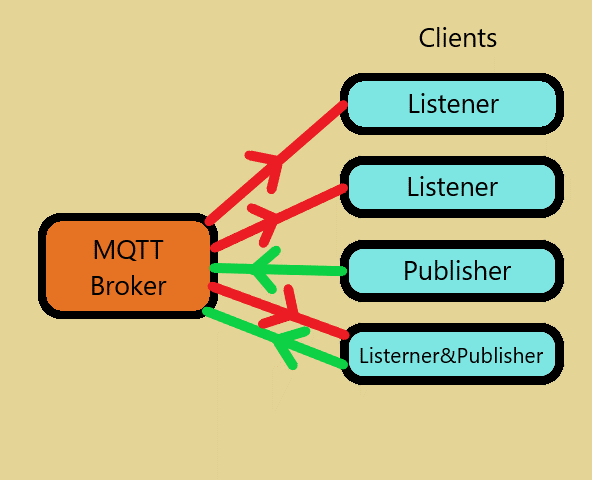
MQTT (at the origin Message Queuing Telemetry Transport) is a protocal to exchange messages through TCP/IP. It is light so its use for the Internet of Things (IoT).
It uses a brocker for dispatch the messages (here isntalled on a Raspberry PI), and a certain number of clients who can listen (Listener), or publish (Publisher), or both, the messages.
The messages are build with a channel (Topic) and a message body (Payload).
MQTT broker installation sur une Raspberry PI
With Bookworm, in Add/Remove Software search "mosquitto" an select "MQTT version 5.0/3.1.1/3.1 compatible message broker". I have used "mosquitto-2.0.11-1.2".
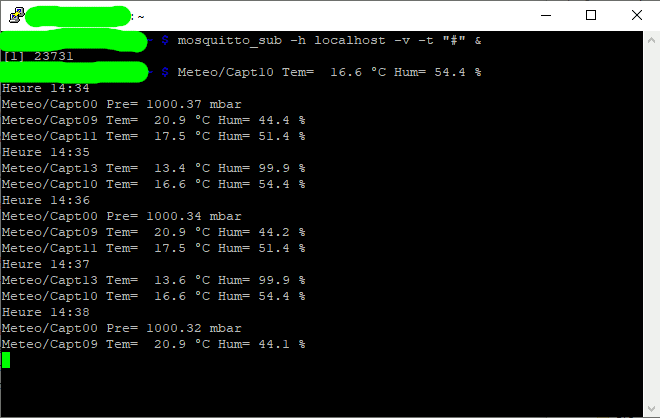
For testing, in a LXTerminal enter mosquitto_sub -h localhost -v -t "\$SYS/#" then Ctl^C then mosquitto_sub -h localhost -v -t "#" &
In a second LXterminal enter mosquitto_pub -h localhost -t test/topic -m "My first hello world for Mosquitto" and you should see on the first terminal "test/topic My first hello world for Mosquitto".
To be able to use anonymous connections, you have to modify the configuration file with sudo nano /etc/mosquitto/mosquitto.conf and append at the end :
# Listen for messages from clients on remote machines listener 1883 # Allow anonymous pub/sub, allow_anonymous is false by default allow_anonymous true # Require client user/password authentication #password_file /etc/mosquitto/passwd
The picture gives an idea of the trafic on my network (with messages for time, pressure and temperature/humidity).
To use MQTT with Python scripts, don't forget to install the paho layer (with the destop : MQTT client class (Python3) python3-paho.mqtt-1.6.1-1)
Time server with the Raspberry
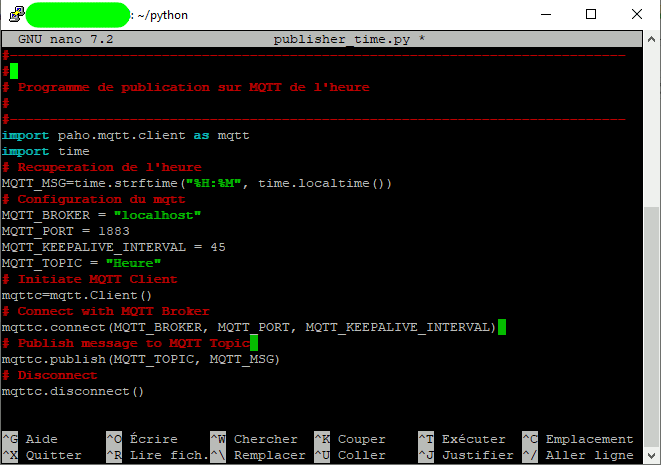
My time server uses the "Heure" channel of the MQTT server. Each minute, the time is published with a "hh:mm" format.
On the picture, you will find the python script (click on it to access the source file) which is periodical launched by the Raspberry task manager.
You only need to enter sudo crontab -e command and append at the end of the file :
* * * * * python3 /home/WhereYouHavePutTheFile/publisher_time.py
Horloge avec le Hat de l'AstroPI

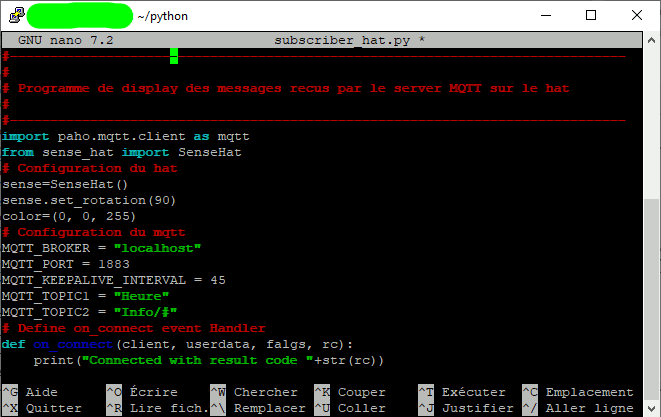
To display the time, I have used a Raspebrry PI with the Hat of the AstroPI which have a display with 8x8 leds and a transparent case.
On the picture, you will find the python script (click on it to access the source file) which lister to the "Heure" channel of the MQTT serveur and the display it on the Hat.
It's also listen to the "Info" channel which I use to display some information duing the boot of the Raspberry.
On the bottom, click on the picture to display a small movie of the display.
Meteo Server
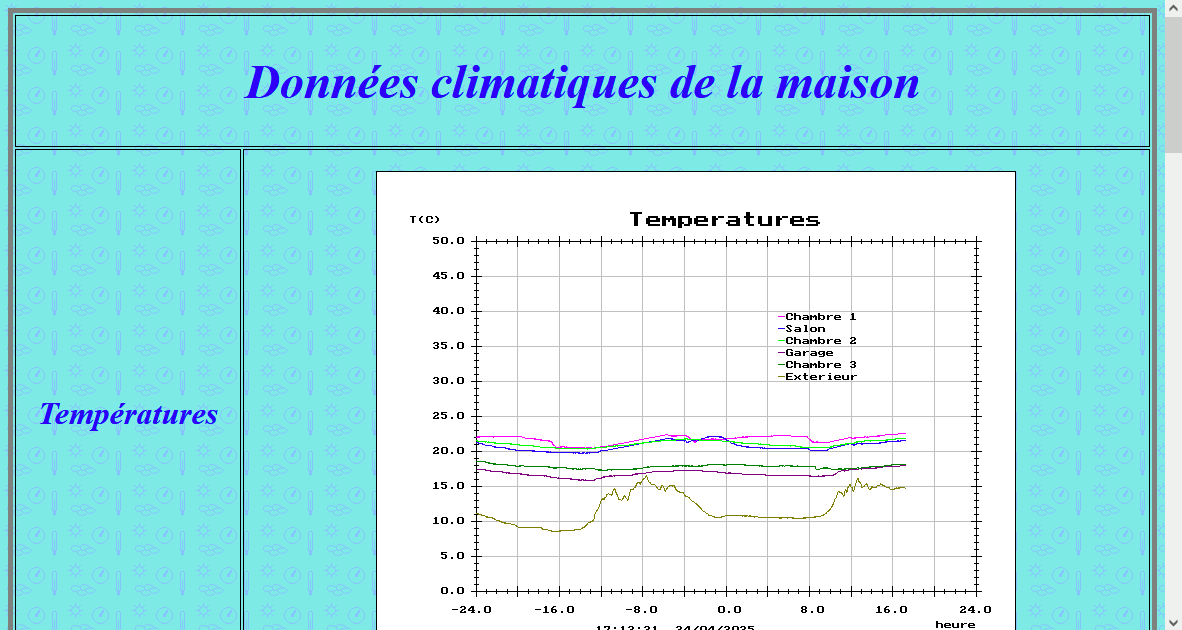
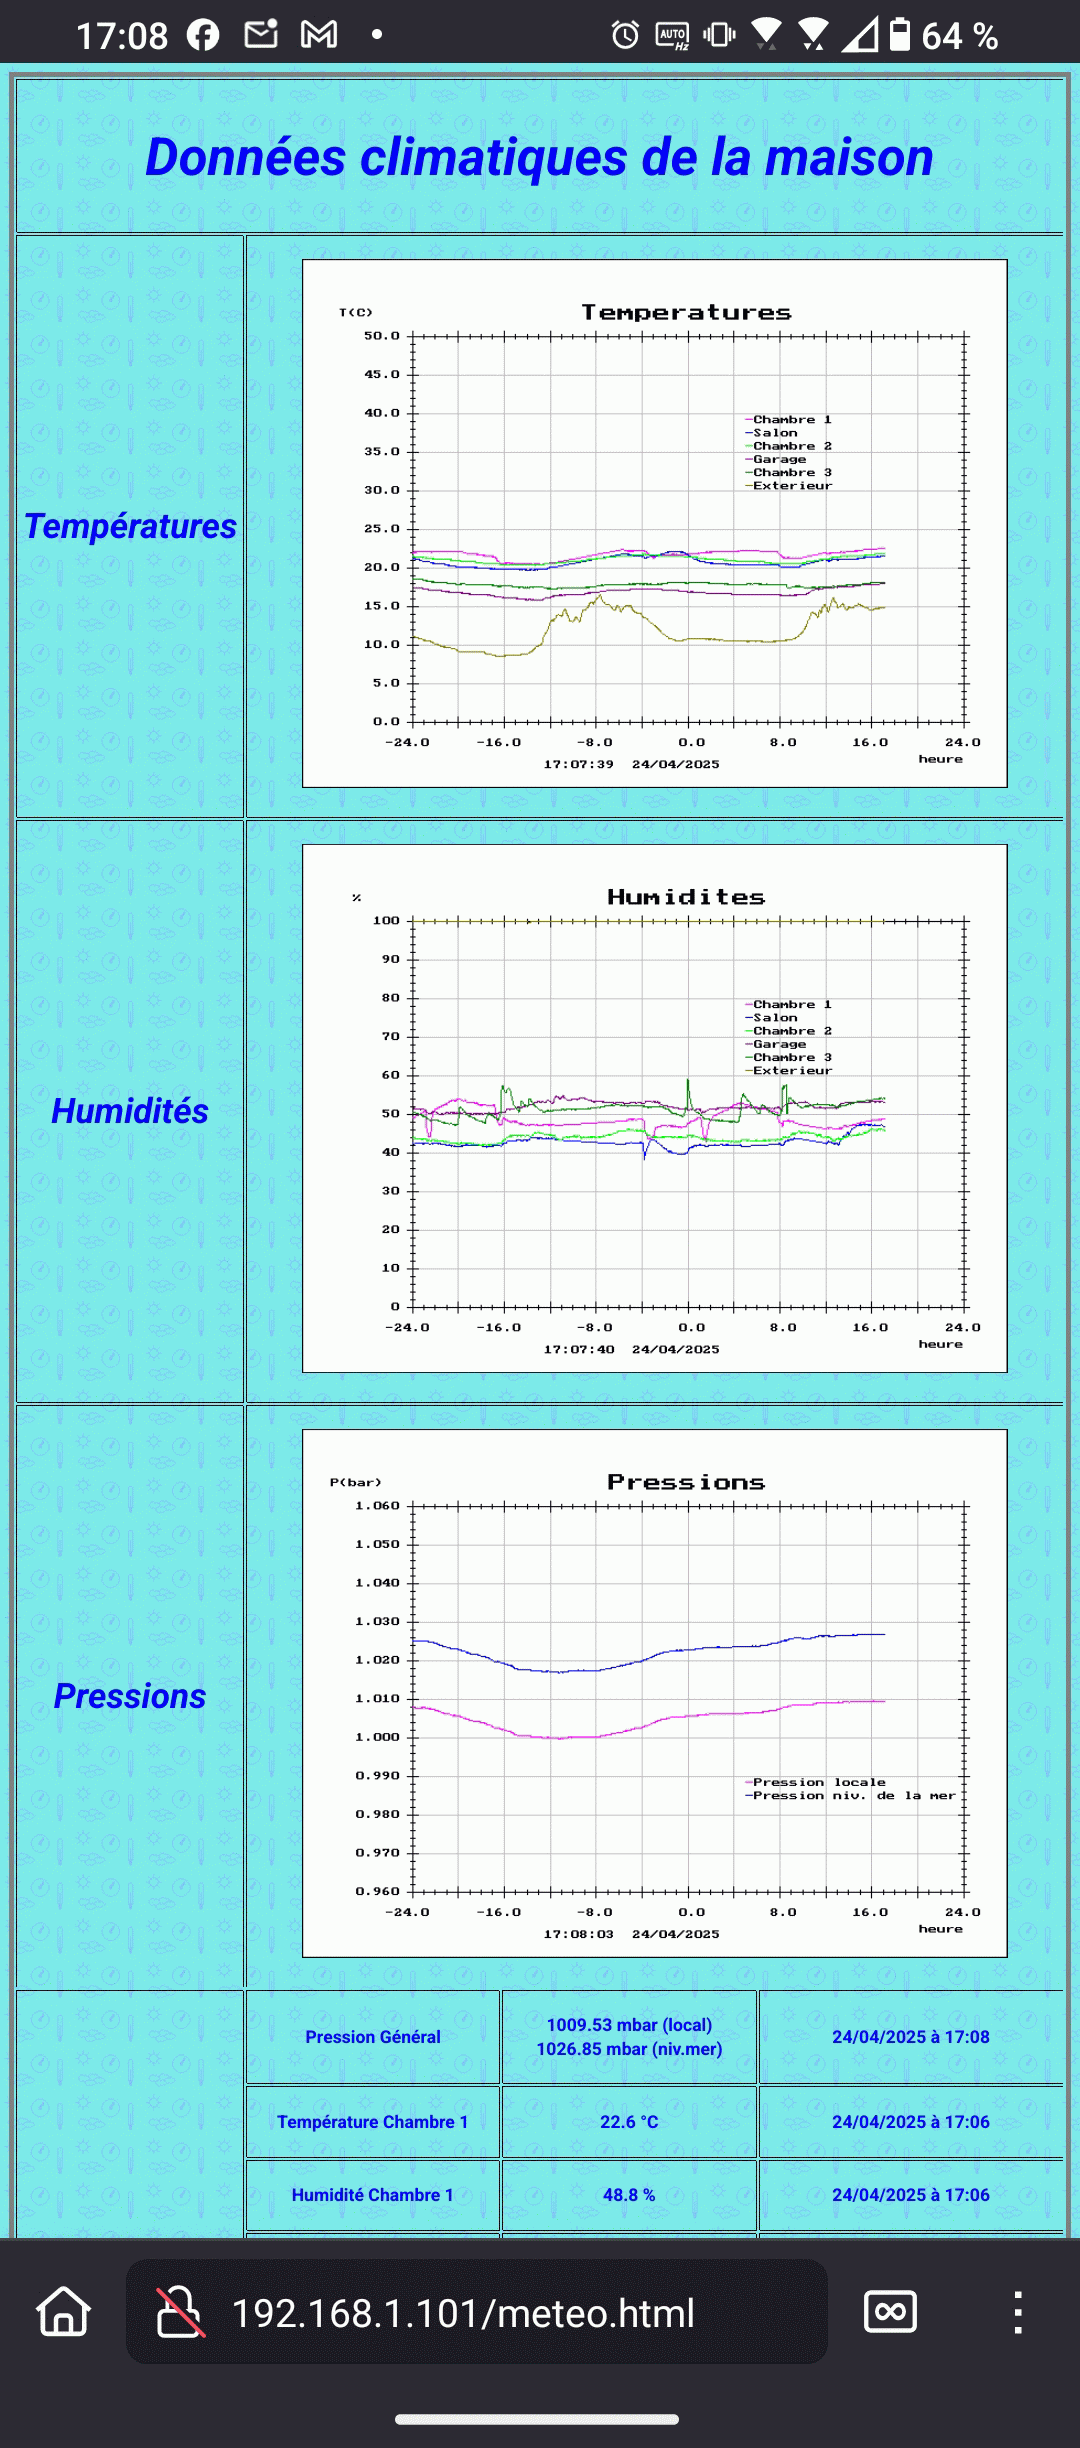
This project gathers a certain number of sensors (for me 6 temperature/humidity sensors and a pressure one) which send their data through MQTT to the Raspberry.
The Rasberry collects them and generate a web page that can be accessed (with the Apache web server) from a computer, a smartphone and even a small ESP32 based box.
The web page contains the plots of the temperature, humidity and pressure of the current day plus the day before and also the last measurements.
On option, you can receive an email of the plots. I have programmed that to receive them once a day.
- On the top, the web page generated (click on it to display it completely),
- On the middle, a snapshot of the screen of my smartphone displaying the same web page,
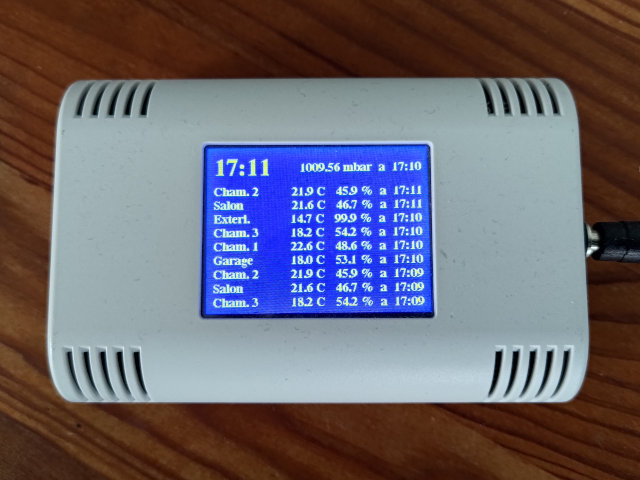
- On the bottom, a picture of my domotic box based on an ESP32 (AZ-Touch box purchased at AZ-Delivery).
This projet is now finished, if you need some more details than the below ones, send me an email !
Temperature and humidity sensor
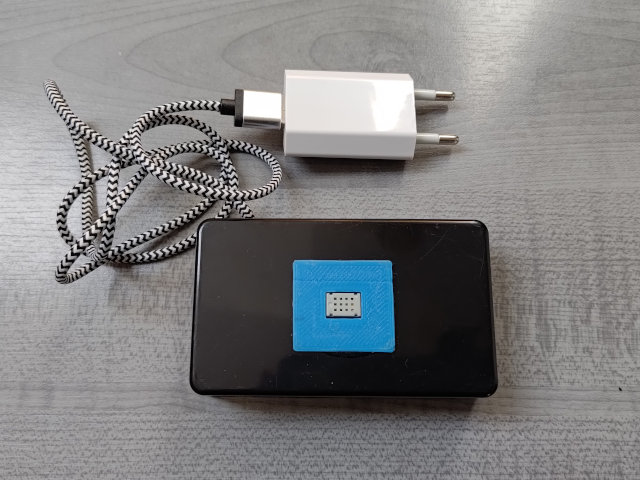
Temperature and humidity sensor are built with a AM2322 sensor and an ESP-12E (ESP8286 family) microcontroler.
A specific webpage for the printed circuit and the software will arrive soon.
I have built a tens models which I have spread in the house and one for the outside, this one supplied with 4 NiMH batteries.
Pressure sensor
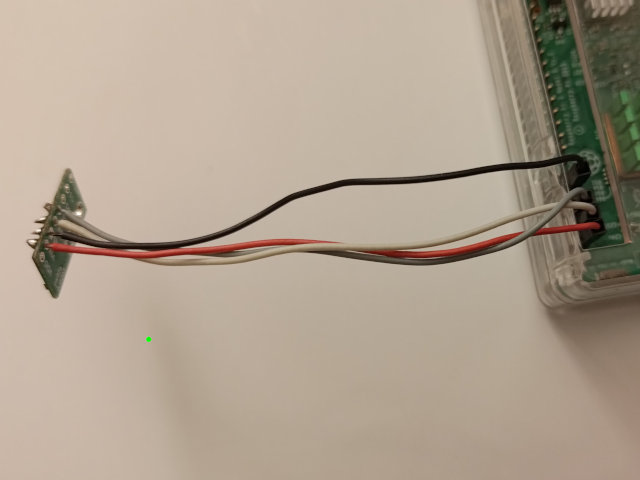
For the atmospheric pressure, I have used the sensor built ont the Sense Hat of the Astro PI (a LPS25HB) or the same component buyed on a small Pololu module (reference 2867) connected to the I2C bus of the Raspberry (bottom picture).
You will find :
- there the Python file for the Sence Hat,
- there the one for the Pololu module.
In both cases, you have to lauch periodicaly the software to publish the presure on the MQTT network.
For that, enter the command sudo crontab -e and add at the end of the file :
*/2 * * * * python3 /home/WhereYouHavePutTheFile/publisher_pressure.py
The altitude compensation (above sea level) can be done with the above software.